
Phyllo Pastry Tart Shells | The Ultimate Guide to Making, Filling & Perfecting Them
Phyllo Pastry Tart Shells
Everything you need to know about phyllo pastry tart shells — from their ancient origins and the science of working with tissue-thin dough, to step-by-step shell-making, inspired fillings for any occasion, and pro storage tips that keep your shells crispy for days.
What Are Phyllo Pastry Tart Shells?
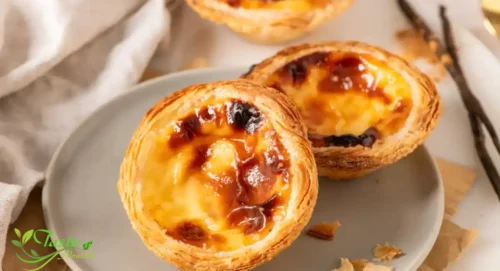
Phyllo pastry tart shells — also spelled filo, fillo, or fyllo — are delicate, crispy, edible cups formed by layering and baking tissue-thin sheets of unleavened dough inside a muffin or tart tin. The result is a feather-light vessel that shatters pleasingly when bitten into, offering a satisfying crunch that heavier pastry alternatives simply cannot match.
Unlike the solid, butter-rich walls of a traditional shortcrust tart, phyllo shells are built up from multiple gossamer layers, each brushed with melted butter or oil before the next is laid on top. The moisture evaporates during baking, leaving behind a stack of paper-thin, golden-bronze layers that crackle with every bite. This construction gives phyllo tart shells an almost architectural quality — light enough to feel elegant at a dinner party, yet sturdy enough to hold a wide range of fillings without collapsing.
“Phyllo tart shells are one of the most versatile canvases in the entire pastry repertoire. Master them once, and you unlock a whole world of effortless entertaining.”— Culinary professionals and home bakers alike agree
One of the most compelling things about phyllo tart shells is their incredible versatility. The same basic shell can hold a silky chocolate ganache for a sophisticated dessert course, a tangy lemon curd crowned with whipped cream for a summer gathering, or a savory mixture of brie and caramelized onion for a cocktail party canapé. Sweet or savory, cold or warm, rustic or refined — phyllo tart shells adapt effortlessly to every context.
Whether you’re purchasing ready-made frozen phyllo cups from the freezer aisle or crafting your own from scratch using sheets of phyllo dough, this guide covers everything you need to achieve perfectly crispy, golden, professional-looking results every single time.
Phyllo vs. Puff Pastry vs. Shortcrust — Key Differences
Home bakers often wonder whether phyllo, puff pastry, or shortcrust is best for tart shells. Each has genuine strengths, but phyllo stands out in several important ways. Here is a clear comparison:
| Property | Phyllo Dough | Puff Pastry | Shortcrust Pastry |
|---|---|---|---|
| Fat Content | Very Low (added externally) | Very High (laminated butter) | Medium–High |
| Calories per serving | ~35 per cup | ~120–160 per cup | ~80–100 per cup |
| Texture | Shatteringly crisp, papery layers | Airy, puffed, buttery | Firm, crumbly, sandy |
| Gluten structure | Developed (stretched dough) | Developed (rolled dough) | Minimal (rubbed-in fat) |
| Vegan-friendly | Yes (use olive oil) | No (butter lamination) | Often No |
| Ease of shaping into cups | Excellent | Moderate | Excellent |
| Make-ahead / freeze well? | Yes — excellent | Yes — good | Yes — good |
| Best for | Elegant bite-sized tarts, canapés, light desserts | Vol-au-vents, turnovers, larger tarts | Deep quiches, fruit pies, classic tarts |
⇑ Phyllo dough compared to puff and shortcrust pastry across key properties relevant to tart shell making.
Several sheets of phyllo can be layered together for a delicate, flaky effect that is sometimes compared to puff pastry, but the two are actually quite different. Puff pastry gets its airy flakiness from lamination — folding layers of butter inside the pastry before baking — while phyllo has relatively little fat content, but achieves a similar effect by using several separate paper-thin pastry sheets.
The practical implication for tart shell making is significant. Because phyllo’s fat is applied externally between layers rather than baked into the dough, you control exactly how much fat goes in. Use more butter for a richer, deeper golden shell; use good olive oil for a lighter, slightly savory result that pairs beautifully with Mediterranean-style fillings.
Types of Phyllo Pastry Tart Shells
Not all phyllo tart shells are created equal. Understanding the different formats helps you choose the right approach for your recipe and occasion.
By Size
| Format | Tin Used | Typical Size | Best Used For |
|---|---|---|---|
| Mini / canapé cups | Mini muffin tin (24-well) | ~1.5 inches diameter | One-bite appetizers, cocktail party nibbles |
| Standard tartlet shells | Regular muffin tin (12-well) | ~2.5–3 inches diameter | Plated desserts, first-course savory tarts |
| Large tart shell | 9–10 inch springform or tart pan | Full-size | Centrepiece dessert, family-style spinach tart |
| Rustic flower cups | Any muffin tin | Variable | Where visual charm matters; petals curl decoratively |
⇑ Phyllo tart shell formats, their tin requirements, and ideal applications.
By Source: Homemade vs. Pre-Made
You have two practical routes to phyllo tart shells:
- Homemade from phyllo sheets — Purchased frozen (or occasionally fresh) phyllo dough sheets are thawed, layered with butter, cut to size, and pressed into tins. This route gives you complete control over size, shape, thickness, and layering, and it costs a fraction of pre-made cups. Any leftover shells freeze beautifully.
- Pre-made frozen phyllo shells — Brands like Athens Foods sell ready-to-use frozen phyllo cups in both mini and regular sizes. Athens Foods makes both sheets of frozen phyllo pastry and also frozen phyllo shells, typically found in the freezer aisle near frozen pie crusts and puff pastry. Depending on how you plan to serve them, they can be used straight from the package or lightly toasted for extra crunch. Pre-made cups are ideal when time is the constraint.
Pro Recommendation For everyday entertaining, homemade shells from phyllo sheets are absolutely worth the minimal extra effort — the quality is noticeably superior in flavor and texture, and you can customize size precisely. Reserve store-bought cups for true time emergencies.
Ingredients & Equipment You’ll Need
Core Ingredients
- Phyllo dough sheets — One standard 16-oz package (about 20 sheets) yields approximately 48 mini shells or 24 standard tartlet shells. Thaw completely in the refrigerator before using — never at room temperature.
- Unsalted butter (melted) or good olive oil — For savory shells, extra-virgin olive oil works beautifully and keeps the result dairy-free and vegan. For sweet applications, clarified butter (ghee) gives the cleanest golden color. Allow roughly 4–6 tablespoons of fat per 6-layer stack of shells.
- Optional flavor additions — A light dusting of finely grated Parmesan between layers adds savory depth; a sprinkle of caster sugar creates a slightly sweeter, crunchier shell ideal for dessert fillings.
Essential Equipment
- Mini muffin tin (24-well) or standard muffin tin (12-well)
- Pastry brush (silicone or natural bristle — silicone is gentler on delicate sheets)
- Sharp knife or pizza wheel (for clean cuts without dragging the dough)
- Large, clean cutting board or dry work surface
- Damp (not wet) kitchen towel or plastic wrap to cover unused sheets
- Wire cooling rack
- Optional: pie weights or dried beans for preventing puffing
Important Before You Start Always have your filling ingredients fully prepared before you open the phyllo package. Phyllo dries out in minutes once exposed to air. Preparation is everything — mise en place is not optional here.
How to Make Phyllo Pastry Tart Shells (Step-by-Step)
Making phyllo tart shells from scratch is far more approachable than most people expect. The process is methodical rather than technically demanding. Follow these steps carefully and you will produce professional-quality shells on your first attempt.
For Mini Phyllo Tart Shells (yields ~24)
-
1
Thaw and prepare your dough Remove the phyllo dough from the freezer and thaw unopened in the refrigerator overnight — ideally 8–12 hours. Never thaw at room temperature. When you are ready to begin, preheat your oven to 375°F (190°C). Grease your muffin tin wells thoroughly with melted butter.
-
2
Set up your work station Lay a large clean cutting board on your counter. Have your melted butter and pastry brush ready. Dampen a kitchen towel (wring it out until it’s barely damp) and set it nearby. Open the phyllo package and unroll the sheets onto the cutting board. Immediately cover with the damp towel — do not let the sheets sit uncovered.
-
3
Layer and butter the sheets Lift one sheet from the stack and lay it flat. Recover the remaining stack with your damp towel. Brush the sheet lightly with melted butter — covering most of the surface but without flooding it. Lay a second sheet on top and press gently. Repeat this process, building a stack of 4 to 6 sheets depending on how sturdy you want your shells. For sweet fillings, 4 layers is usually sufficient; for heavier savory fillings, use 5–6 layers.
-
4
Cut into squares Cut the rectangle in half and brush one half with butter, placing the other half on top. You should now have a rectangle made up of four layers of phyllo. Divide the dough into 12 equal squares. For a mini muffin tin they should be around 3×3 inches (7½ cm). A pizza wheel makes the cleanest cuts without dragging.
-
5
Press into the tin Gently press each square into a well of the prepared muffin tin, nudging the dough down into the corners to create an even cup shape. The corners will fan out decoratively above the rim — this is desirable and gives the shells their distinctive flower-like appearance. Press firmly enough to eliminate large air pockets in the base.
-
6
Weight the bases (optional but recommended)If you want perfectly flat shell bases — particularly for cold fillings like custard or lemon curd — add a small amount of dried beans or pie weights to each well before baking. This prevents the bases from puffing up, which would reduce the filling capacity and create fragile, easily cracked bottoms.
-
7
Bake to golden per fection Bake for 10 minutes until lightly golden if you plan to fill them with something that needs further baking, such as quiches. If you plan to fill them with something that doesn’t need baking, such as custard and berries or a cold savory filling, bake them for a total of 15 minutes. Keep a close eye on the oven — phyllo goes from golden to burnt quickly.
-
8
Cool completely before filling Remove the tart cases from the muffin tin and cool on a wire rack. If storing, wait until completely cool before transferring them to an airtight container. Filling a warm shell causes steam condensation that softens the layers — always cool completely first.
Key Takeaway The golden ratio for most mini phyllo tart shells is 4–6 sheets, 375°F, and 12–15 minutes in the oven. Adjust layers based on your filling weight, and always pre-bake slightly less if the filling itself will bake further.
Expert Tips for Working with Phyllo Dough
Phyllo has a reputation for being finicky, but the challenges are easy to manage once you understand what the dough needs. These tips separate confidently crispy shells from cracked, soggy disasters.
Thawing and Temperature
- A very common mistake is to leave phyllo dough to defrost at room temperature, as this makes the outer layers gummy. When working with phyllo dough, it should be defrosted, but still cold.
- Take the dough from the refrigerator only when your work station is fully set up and your butter is melted and ready.
- If you take some out and your plans change, you can keep thawed, unopened phyllo dough in the fridge for up to 4 weeks.
Preventing Dryness — The Single Most Important Technique
- Phyllo dries out quickly. Once the dough is unwrapped and unrolled, cover it with plastic wrap, then a damp kitchen towel. Work with one sheet at a time and keep the other sheets covered.
- The towel should be barely damp — if it’s too wet, it transfers moisture unevenly and creates sticky patches. Wring it out thoroughly before using.
- Work as quickly as possible without rushing. Speed comes naturally after your second or third batch.
Butter Application
- You do not need to cover every millimeter with butter — aim for about 70–80% coverage per layer. Gaps in coverage create interesting textural variation rather than structural weakness.
- Clarified butter (ghee) is the professional’s choice: its lower water content means less steam in the oven, resulting in crisper, more evenly golden shells.
- For a vegan option, brush generously with a light-flavored olive oil or neutral vegetable oil. The result is slightly less rich but still delicious.
Dealing with Tears
- Tears are normal — especially with your first few sheets. Do not discard a torn sheet; simply lay a small patch of dough over the tear and brush with butter. Once baked, the layers bind together and tears become invisible.
- Reserve torn or imperfect sheets for the inner layers of your stack, placing the most intact sheets on the outside.
Preventing Soggy Shells
- Always bake shells completely before adding cold or room-temperature fillings. A warm, freshly baked shell is the enemy of long-term crispiness.
- Fillings can be moist, but ensure they’re not too watery so the shells don’t get soggy. Ingredients that release a lot of liquid (like mushrooms) and meats should be pre-cooked.
- For presentations where shells must hold filling for several hours, add a thin layer of melted chocolate (for sweet fillings) or cream cheese (for savory) to the inside base before filling — this acts as a moisture barrier.
Reader Note Experienced phyllo bakers use a spray bottle of water misted over the top layer just before baking. This creates steam that keeps the uppermost layer pliable during the first few minutes, then dries out completely to produce a beautifully crunchy, blistered top surface.
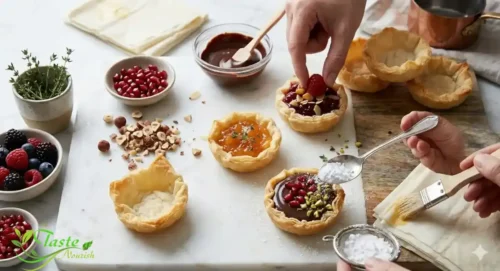
Sweet & Savory Filling Ideas for Phyllo Tart Shells
The beauty of a perfectly made phyllo pastry tart shell is that it asks nothing of the filling except that it be delicious. Whether you are planning a summer garden party, an autumn dinner gathering, or a holiday cocktail hour, there is a phyllo tart filling perfectly suited to the moment.
Sweet Fillings
Citrus & Cream
- Lemon curd + whipped cream
- Lime curd + cream cheese
- Orange mascarpone + candied zest
- Passion fruit curd + coconut cream
Fresh Fruit
- Vanilla pastry cream + seasonal berries
- Ricotta + honey + figs
- Whipped cream + strawberry slices
- Nutella + sliced banana + toasted hazelnuts
Chocolate & Indulgent
- Dark chocolate ganache + sea salt flakes
- White chocolate mousse + raspberries
- Salted caramel + toasted pecans
- Espresso cream + cocoa dusting
Holiday Classics
- Cranberry curd + whipped cream
- Pumpkin spice custard
- Warm mincemeat + brandy cream
- Baklava-style honey, walnut & cinnamon
Savory Fillings
Cheese-Based
- Brie + warm cranberry sauce
- Spinach + feta + egg (mini quiche)
- Cream cheese + jalapeño pepper jelly
- Goat cheese + caramelized onion + thyme
Seafood
- Shrimp ceviche
- Hot crab dip
- Smoked salmon + crème fraîche + dill
- Tuna tartare + avocado
Vegetable
- Artichoke dip
- Roasted red pepper + hummus
- Caponata
- Mushroom duxelles + thyme cream
Meat & Poultry
- Pulled chicken + buffalo sauce
- Spiced lamb + tzatziki
- Prosciutto + melon + rocket
- Dirty rice or taco filling
Serving Strategy for Entertaining Fill phyllo tart shells at the last possible moment for maximum crispiness. For large gatherings, set up a filling station where guests can fill their own shells — it keeps the shells crisp longer and becomes an interactive element of the party.
Storage, Freezing & Make-Ahead Advice
One of the greatest practical advantages of phyllo pastry tart shells is how well they respond to advance preparation. Done correctly, you can have a supply of perfectly crispy shells waiting in your freezer for weeks.
Storing Unbaked Phyllo Dough
| Condition | Storage Method | Duration | Notes |
|---|---|---|---|
| Frozen, unopened | Freezer, in original packaging | Up to 3 months | Best quality within 1 month |
| Thawed, unopened | Refrigerator | Up to 4 weeks | Do not refreeze |
| Opened / partially used | Tightly wrapped in plastic, refrigerated | Up to 3 days | Wrap as airtight as possible |
⇑ Storage guidelines for uncooked phyllo dough sheets.
Storing Baked Phyllo Tart Shells
Baked phyllo should be stored in an airtight container for up to 3 days or frozen for up to 3 months. For best results:
- Wait until shells are completely cool before storing — any residual warmth creates steam inside the container, softening the layers.
- Line your storage container with a sheet of kitchen paper to absorb any atmospheric moisture.
- Do not refrigerate unfilled baked shells unless absolutely necessary — the refrigerator’s humidity degrades crispiness faster than room-temperature storage in an airtight container.
- Freeze unfilled baked shells in a single layer first, then transfer to a zip-lock freezer bag. Re-crisp in a 350°F (175°C) oven for 4–5 minutes directly from frozen.
Make-Ahead Timeline for Entertaining
- Up to 1 month ahead — Bake shells, cool completely, freeze in airtight layers.
- Up to 3 days ahead — Bake shells, cool, store in an airtight container at room temperature.
- Day of the event — Re-crisp shells for 5 minutes at 350°F if needed. Prepare fillings.
- 30–60 minutes before serving — Fill shells. For cold fillings, keep refrigerated until service time.
Troubleshooting Common Problems
| Problem | Likely Cause | Solution |
|---|---|---|
| Shells are soggy after filling | Filling added too hot, or filling too watery | Cool shells fully; cook watery ingredients first; add a moisture barrier (cream cheese layer) to base |
| Sheets tearing badly | Dough too dry; thawed too quickly | Keep covered with damp towel; patch tears with small dough pieces; work faster |
| Bases puffing up during baking | Air pockets trapped under base layers | Press firmly into tin corners; use pie weights; dock (poke) bases with a fork before baking |
| Shells burning at edges | Oven too hot; thin corner layers over-exposed | Reduce to 350°F; tent with foil after 8 minutes; check oven calibration |
| Shells pale and soft (not golden) | Underbaked; insufficient butter | Bake longer; ensure butter reaches all surface areas; use clarified butter |
| Shells sticking to tin | Tin not greased adequately | Butter tin wells thoroughly before pressing dough; use a non-stick tin; cool for 5 minutes before removing |
| Layers not separating (dense texture) | Too much butter applied; sheets pressed too hard | Apply a thin, even butter coat; press gently into well rather than compressing |
⇑ Common phyllo tart shell problems, their causes, and practical solutions.
Nutrition Profile of Phyllo Pastry Tart Shells
One of phyllo’s most compelling attributes is its nutritional profile relative to richer pastry alternatives. Because the dough itself contains almost no fat — fat is added only between layers during assembly — you can control calorie density far more precisely than with butter-laminated pastries.
| Nutrient | Per Mini Shell (~4 layers) | Per Standard Tartlet (~6 layers) |
|---|---|---|
| Calories | ~35 kcal | ~65–80 kcal |
| Total Fat | ~2–3g | ~4–5g |
| Saturated Fat | ~1–2g | ~2–3g |
| Carbohydrates | ~3–4g | ~6–8g |
| Protein | ~0.5–1g | ~1–2g |
| Sodium | ~20–30mg | ~40–55mg |
| Fiber | ~0–1g | ~0–1g |
⇑ Approximate nutritional values per unfilled phyllo tart shell. Values vary by number of layers, butter quantity, and shell size.
For context: a comparable shortcrust pastry shell runs approximately 90–120 calories and 6–9g of fat per serving. A puff pastry cup often exceeds 120 calories and 8–10g of fat. Phyllo’s inherent lightness is a genuine nutritional advantage when you’re serving a range of rich fillings alongside.
Vegan and Allergen Notes Phyllo dough itself is typically vegan — containing only flour, water, a small amount of oil, and sometimes a touch of vinegar or salt. Always check the package label, as some commercial versions include egg. Substituting olive oil for butter makes the assembled shells fully vegan and dairy-free while maintaining excellent results.
The Fascinating History of Phyllo Dough
Few ingredients carry as rich a historical legacy as phyllo dough. Understanding where it comes from deepens an appreciation for what makes it so special — and why it has endured across centuries and civilizations.
Ancient Roots and Ottoman Refinement
The origin of filo is generally attributed to the Turkic peoples of Central Asia, who developed traditions of thin, layered flatbreads called yufka during the medieval period to suit their nomadic lifestyle, while its paper-thin form is likely to have evolved later in the palace kitchens of Ottoman Istanbul. The very name “phyllo” speaks to this elegant thinness: the word filo or phyllo comes from the Greek φύλλο, meaning “thin sheet” — literally, “leaf.”
In the medieval period, nomadic tribes in modern-day Turkey created layered breads by rolling sheets of dough into ultra-thin layers. This very rudimentary form of filo pastry was later adapted into a more complex dish, adding the Persian staple of nuts to make an early form of baklava.
Phyllo pastry became an integral part of Turkish high society, and until the First World War, upper-class households would employ two filo makers — one to make extra-thin sheets for baklava, and one to make slightly thicker sheets for börek. This extraordinary level of specialization tells us everything about how prized the craft was.
From Palace Kitchens to Global Tables
The Turks introduced paper-thin dough throughout the Ottoman Empire, including the Balkans, where it became known as phyllo (“leaf” in Greek) and fila in Arabic. As the Ottoman Empire expanded and contracted across centuries, it carried phyllo with it — into the Balkans, across the Middle East, and eventually into North Africa and beyond.
Today, phyllo appears in hundreds of regional recipes across dozens of countries, from Greece’s iconic spanakopita and baklava to Morocco’s pastilla, Bulgaria’s banitsa, and Lebanon’s warbat. Beginning in the 1960s, Greek immigrants began to popularize hand-made filo in parts of the United States, and the commercial frozen phyllo product that most home cooks use today is a direct descendant of that popularization.
Did You Know? The word “phyllo” (φύλλο) means “leaf” in Greek — a perfect description for sheets so thin you can read text through them. Traditional artisan phyllo makers can stretch a single ball of dough across an entire kitchen table into one enormous, translucent sheet.
Frequently Asked Questions
Can I make phyllo tart shells ahead of time?
Yes — this is one of phyllo’s greatest advantages for entertaining. Baked shells keep in an airtight container at room temperature for up to 3 days, or frozen for up to 3 months. Re-crisp briefly in a 350°F oven if needed before filling.
How do I stop phyllo tart shells from going soggy?
The three-part answer is: bake fully and cool completely before filling; avoid overly wet fillings (pre-cook moisture-releasing ingredients); and fill as close to serving time as possible. For presentations requiring more lead time, coat the inside base of each shell with a thin layer of melted chocolate or cream cheese to act as a moisture barrier.
How many layers of phyllo do I need for tart shells?
For mini shells with light sweet fillings, 4 layers is ideal. For standard-size shells or heavier savory fillings (meat, hot dips), 5–6 layers provides better structural integrity. More than 6 layers creates a shell that starts to feel dense rather than delicate.
Can I use olive oil instead of butter?
Absolutely. Olive oil is traditional in Greek and Mediterranean phyllo preparations. Use a light or medium olive oil for sweet shells (extra-virgin can have too assertive a flavor); extra-virgin works beautifully for savory applications and pairs especially well with Mediterranean-style fillings.
What is the difference between phyllo, filo, and fillo?
They are identical — different transliterations of the same Greek word (φύλλο, meaning “leaf”). Athens Foods uses “fillo,” most American brands say “phyllo,” and British recipes typically write “filo.” The product and technique are the same regardless of spelling.
Why did my phyllo shells puff up in the middle?
Air pockets trapped between the dough and the tin base expand during baking and push the bottom up. The fixes are: press the dough firmly into the well corners before baking; add a few pie weights or dried beans to each cup; or use a fork to dock (gently poke) a few holes in the base before baking to allow steam to escape.
Can I freeze filled phyllo tart shells?
It depends entirely on the filling. Empty shells freeze brilliantly. For filled shells, custard and cream-based fillings do not freeze well — they separate upon thawing. Savory baked fillings (like mini quiches) freeze reasonably well and can be reheated from frozen at 350°F for 10–12 minutes. When in doubt, freeze shells empty and fill after thawing.
Are phyllo tart shells the same as pre-made Athens phyllo cups?
Pre-made Athens phyllo cups (and similar brand products) are factory-produced miniature phyllo shells, sold frozen. They are the same concept as homemade phyllo tart shells but made with commercial equipment that achieves extreme thinness. They are a convenient shortcut — the main trade-off is a slightly less substantial texture than well-made homemade shells, and less flexibility in sizing.
The Bottom Line
Phyllo pastry tart shells sit at a rare intersection of elegance and accessibility. Their ancient lineage — stretching from the nomadic steppes of Central Asia through the palace kitchens of Ottoman Istanbul to modern entertaining tables around the world — speaks to an enduring truth: when something this versatile and this beautiful comes together so simply, it earns its place in every cook’s repertoire.
Whether you are making a batch of 48 mini canapé cups for a cocktail party, crafting a single generous tart shell for a family spinach pie, or simply experimenting with lemon curd and whipped cream for a weeknight treat, the principles remain the same: thaw properly, work quickly, keep your unused sheets covered, butter generously but not excessively, and bake until deeply golden.
Master those fundamentals, and phyllo pastry tart shells will become one of your most trusted, most impressive, and most beloved tools in the kitchen.
Sources & References
- Wikipedia contributors. “Filo.” Wikipedia, The Free Encyclopedia. https://en.wikipedia.org/wiki/Filo
- Great British Chefs Editorial Team. “Focus on Filo Pastry.” Great British Chefs. https://www.greatbritishchefs.com/features/focus-on-filo
- Fine Dining Lovers. “What Is Phyllo Dough and How to Use It.” Fine Dining Lovers. https://www.finedininglovers.com/explore/articles/what-phyllo-dough-and-how-use-it
- Taste of Home Editorial Team. “Tips for Working with and Storing Phyllo Dough.” Taste of Home. https://www.tasteofhome.com/article/tips-for-working-with-and-storing-phyllo-dough/
- Gather & Be. “Mini Phyllo Tart Cups.” Gather-Be.com. https://www.gather-be.com/post/mini-phyllo-tart-cups